How to migrate from public email addresses like Gmail, Yahoo, and Hotmail to your custom domain
It is very common for new business owners to use public email services like Gmail, Yahoo, and Hotmail. Using emails hosted on these services is very convenient and probably the last thing for a new business owner to worry about. As a result, millions of new business owners start using addresses with @gmail.com, @yahoo.com, @hotmail.com, or @outlook.com when corresponding with their clients.
Although using such email addresses is easy, convenient, and free, it is not always the best solution once the business grows. There are several disadvantages:
- It does not portray a professional image
- It is difficult to keep business emails isolated from personal messages
- It is not practical when the number of employees grows, and they need individual accounts
Unfortunately, moving to a custom email address is not trivial and poses its challenges:
- Clients have saved your old address in their address book, and they keep sending messages to it
- You are not technical enough to make this transition
This article demonstrates a step-by-step method to switch from a public email address to your custom domain name.
Tutorial Video
Watch a short six minutes video on this topic to quickly learn the technique.
The Goal
The final goal of this exercise is to:
- Create a custom domain allowing your employees to correspond with your clients
- Use both addresses (@gmail.com and your new address) for some time, allowing your clients to reach your business using both methods
- Provide a better email experience by enabling features like enhanced filtering spam, end-to-end encryption, mailing lists like sales@, support@, and more.
Steps-by-Step Instructions
Step 1: Register a domain
First, you need to register a domain that is not in use. For the purpose of this demonstration, we will use a fictitious domain called ez-accountants.com. This must be done by a domain registrar. Here are a few names:
Note that besides registering a domain, you will also need a DNS server. Registrars mentioned above provide that service for free when you register a domain with them.
Step 2: Designate a machine for your email server
You will need to run an email server somewhere on the Internet, with the following requirements:
- It must have a static IP address
- It must be running continuously
- It must run on a reliable network
Although you can run this machine either in your home or office, a better and more cost effective approach is to rent a virtual private server (VPS) on the Internet. Search Google for VPS Hosting to get a list of service providers.
Step 3: Install Xeams
Next, download and install Xeams on your VPS server. Xeams is an excellent choice for an email server and includes a feature that can pull emails from other servers into your domain. This feature is called POP3 Fetcher, which pulls emails from any POP3/IMAP server and puts the messages in the same Inbox where emails for your custom domain reside.
This allow users to view and reply messages from the same Inbox regardless of the address it was sent to.
Contact our support department if you need help during installation or configuration of Xeams.
Step 4: Configure the DNS server
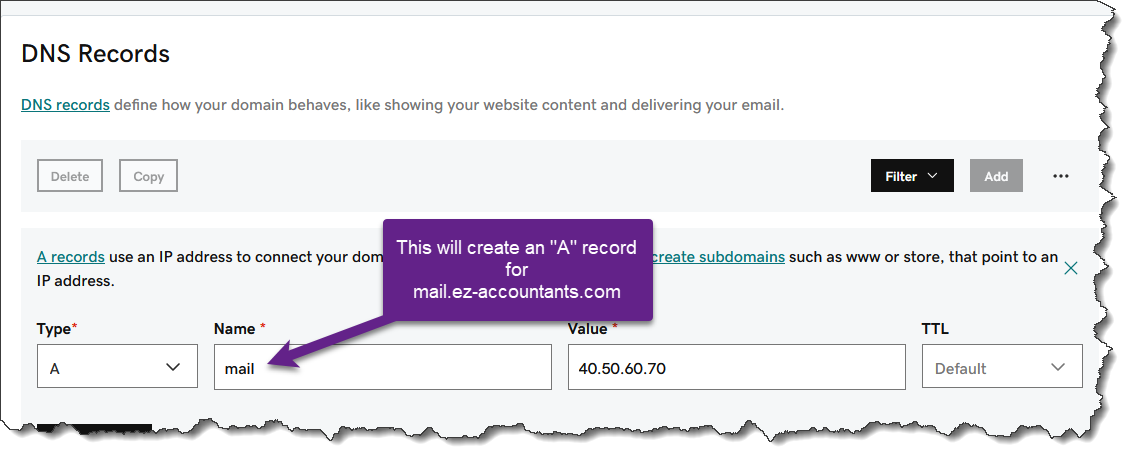
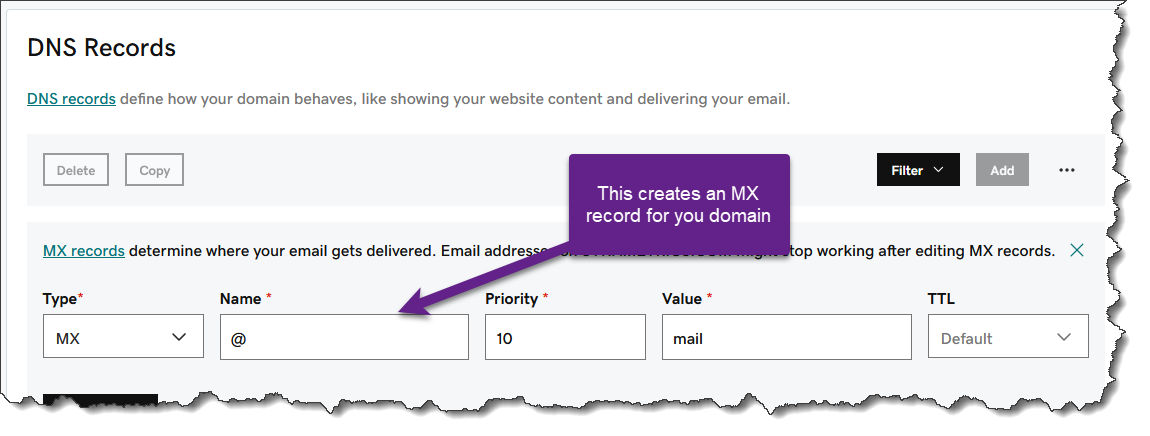
Assume the IP address of your VPS server is 40.50.60.70 and the fully qualified domain name (FQDN) for the machine is mail.ez-accountants.com. At the very least, you will need two records in the DNS server to receive emails:
- An A record pointing
40.50.60.70tomail.ez-accountants.com. See image below, demonstrating how to create an A record on GoDaddy. -

- An MX record with priority 10 pointing to
mail.ez-accountants.com. The following image demonstrates creating an MX record on GoDaddy.
Important: In addition to these two records, you will need additional records for SPF, DKIM and DMARC for sending outbound emails.
How It Works
Once everything is setup, your should be able to connect to Xeams with an email client like MS Outlook, Mozilla Thunderbird, or a client on iOS or Android to fetch your emails. Messages sent to both @gmail.com and @ez-accountants.com will be displayed in the same location.
Your replies to any received message will go out from your new domain, letting your clients know about the new email address.
