Sending Test Email with OAuth2
Email Sender is a convenient way to test email connectivity. Lately, SMTP Authentication using legacy mechanisms has been discouraged in favor of OAuth2. This page discusses steps for creating an OAuth-compatible Access Token and then using that token to send an email. There are no prerequisites for this article. It assumes you have not used OAuth in the past. Most folks are familiar with a user ID and password. This article explains how you can transition from that concept to OAuth2.
Key Concepts
Let's discuss some key concepts in layman's terms.
- Instead of a user ID/password combination, you use an Access Token.
- Think of Access Token as short-lived, constantly changing passwords. Typically, they last no more than an hour.
- Since the Access Token constantly changes, you need a mechanism to pull new tokens once they expire. This is done through Refresh Tokens. Moreover, Access Tokens are not just a one-word password. Instead, they contain rich information about the user's identity and the resources they can access.
- Since Access Tokens are short-lived, you can give them to a third-party entity to perform tasks on your behalf without revealing your password. The remainder of this article assumes this third-party application is the Email Sender application used to send emails to an SMTP server.
Goals
- Use a free Outlook account hosted on Microsoft to email anyone on the Internet without using Outlook/Hotmail's web interface.
- Create an Access Token for OAuth 2.0.
- Use that to send an email using Email Sender.
Obtaining an Access Token
The most challenging part of using OAuth is obtaining and renewing Access Tokens. This is usually done using APIs that adhere to RFC 6749. However, we will use Postman, a freely available software, to simplify matters. Moreover, we will use a free account from Microsoft Azure to create this Access Token. Here are step-by-step instructions.
You will need Postman to send requests to Microsoft. You don't have to create an account in Postman if you don't want to save your session, which is fine for the purpose of this article.
Note:
Eventually, Postman will be replaced by a custom application that you develop.Our goal is to use Microsoft's SMTP server to route emails to recipients online, which requires creating an account. Visit Azure's home page to do that.
Many services offered in Azure are free. Although, Microsoft will ask you to provide your credit card number when creating this account, your card will not be charged.
Let's say user creating this account is identified by jack@hotmail.com.
This step follows and summarizes instructions on this page published on Microsoft's website.
- Next, you need to register Email Sender, a third-party application to which you will grant permission. Enter "App registration" in the search bar after logging in to your Azure account.
- Click New registration on the upper left-hand corner.
- Enter a name for this app on the following page and select the third option, as shown below.
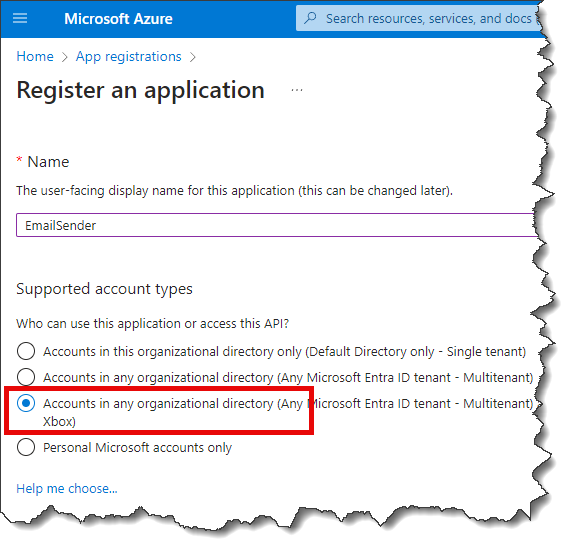
You must use the third option if you want the sender of this email to be any Hotmail/Outlook.com user. Consider the following scenario that will require you to choose this option.
Imagine you're working on an application that relies on John, who has a free Hotmail account, to sign in using his credentials. Once John signs in, you want to invite his friend Jane via email. You aim to send this invitation on John's behalf using his email as the sender.
To recap, you're registering a third-party application asking an unknown person (John) to use his credentials before emailing Jane.
- You will see two additional fields further down on this screen. Select "Web" and enter
https://www.getpostman.com/oauth2/callbackfor the URL as shown below.

This callback URL will refer to your application after you replace Postman.
- Click the Register button you see towards the bottom.
- Next, click Manage/Certificates & secrets on the left.
- Select the Client secret tab, and click New client secret.
- Give it a name and click Add.
- VERY IMPORTANT: copy the string of characters you see under the Value column. This value will not be displayed again and you will need it later on.
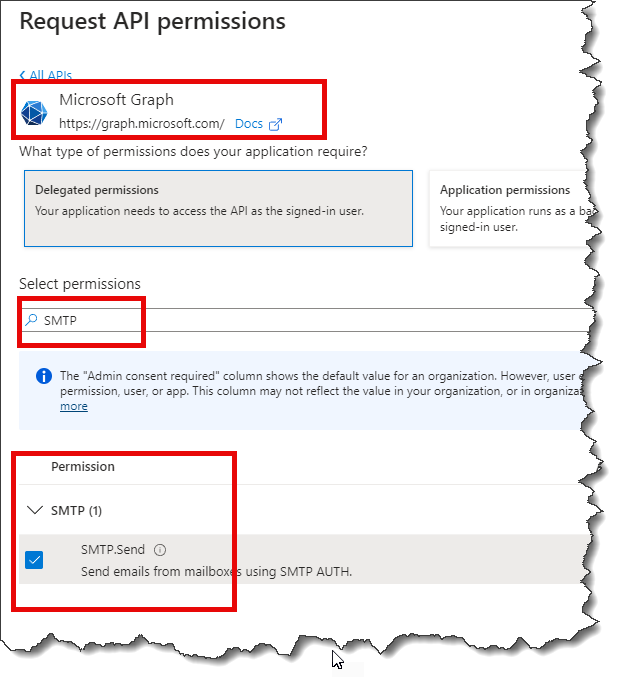
- Next, click API permissions on the left. Click Add a permission. Select Microsoft Graph,
Delegated permissions, and search for SMTP. Click SMTP.Send from the results, as shown below.
- Finally, click Overview and stay on this page. You will need to copy/paste values from this page into Postman.
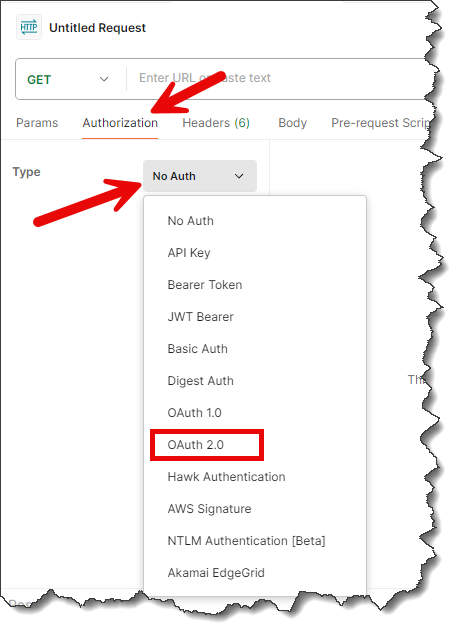
Open Postman and click the New on the left. Then, select HTTP for the protocol.
Next, click Authorization, and select OAuth 2.0 as the Type, as shown below.
The following table describes values that go in different fields in Postman:
| Field Name | Description |
|---|---|
| Grant Type: | Select Authorization Code from the list. |
| Callback URL: | This must be same as you put during the App registration, which is https://www.getpostman.com/oauth2/callback |
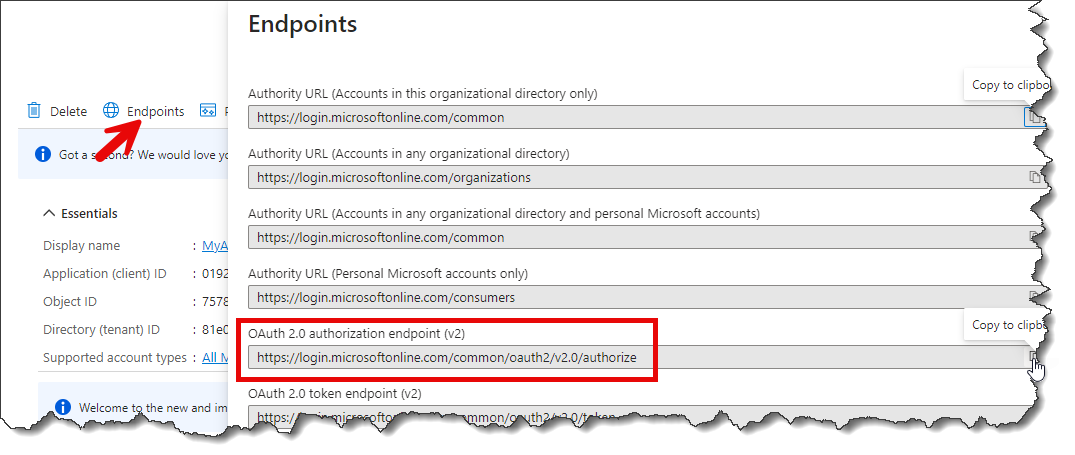
| Auth URL: | Switch to the screen displaying Azure configuration, click Endpoints, and copy/paste the
value from OAuth 2.0 authorization endpoint (v2) as shown below.
|
| Access Token URL | Copy/paste the values from the OAuth 2.0 token endpoint (v2) displayed in Azure configuration. |
| Click ID | This is the Application (client) ID field in Azure. |
| Client Secret | This value was created in step 3 when you create a secret. |
| Scope | Enter https://outlook.office.com/SMTP.Send for this field. This value was
copied from this page. |
| Client Authentication | Select Send as Basic Auth header |
Click the Get New Access Token button when ready. This will open a browser-like window prompting you to sign-in to a Microsoft account.
You don't have to log in as the user who registered the app in Azure, which was assumed to be
jack@hotmail.com. Instead, you can sign in using any account hosted on Microsoft, free or paid.
Once done, you will be displayed your new Access Token, as displayed in the image below.
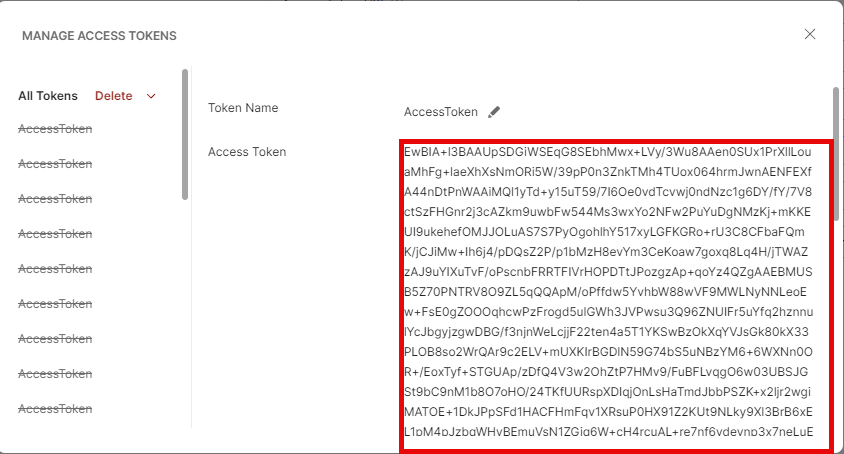 Copy the characters you see on this screen.
Now you're ready to send an email. Download Email Sender and run it on your machine.
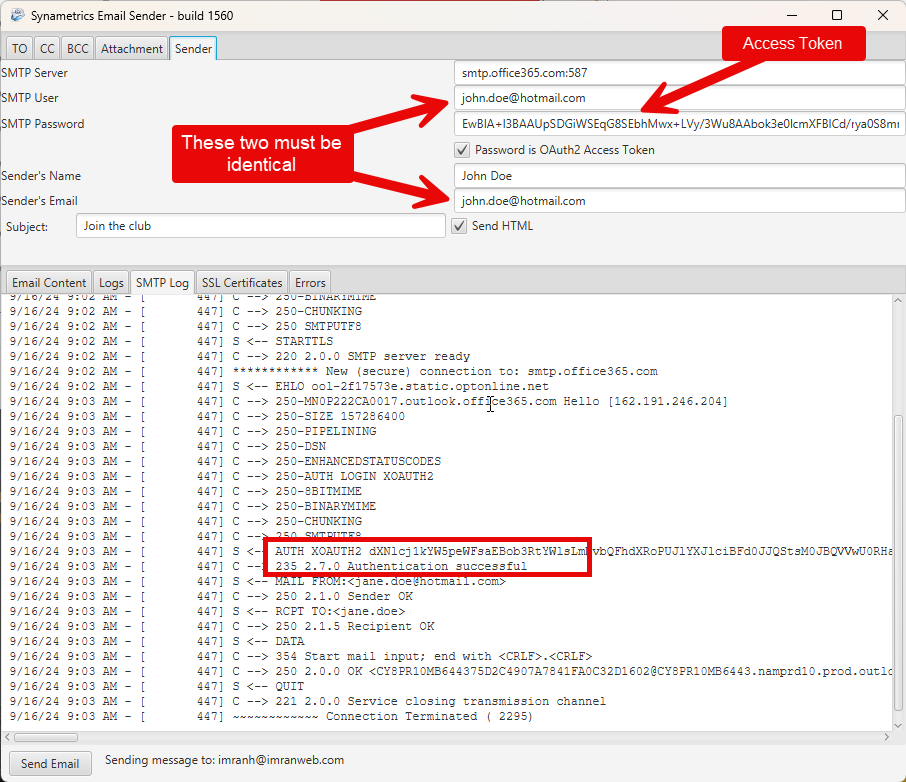
You will have to copy/paste the newly created Access Token in the password field and check the box for OAuth,
as shown below.
What happens in the background
The following steps occur in the background after you click the button to fetch a new Access Token in Postman.
- Postman sends a request to the URL specified in the Authorize Endpoint. This request goes to Microsoft.
- Microsoft asks a valid user to log in.
- During this process, Microsoft will prompt users to confirm whether they trust the application you registered in Step 2. This consent screen will let the user know that if they proceed, emails will be sent on their behalf.
- Once permission is granted, an authorization code is sent to the Redirect URL, which, in this case, is set to Postman, serving as a bridge for the authorization process. Using this authorization code, Postman sends a request to Microsoft asking for an Access Token, which is finally displayed on the screen.
Refresh Token
As mentioned earlier, Access Tokens are short-lived and must be refreshed after some time. As a result, when Microsoft sends the Access Token for the first time, it also includes a Refresh Token. The client application is expected to store this refresh token in a safe place. Refresh tokens only expire if there is no activity for a long time (~ six months). Therefore, applications can use them to pull new Access Tokens.
